Process & Tools Can Make Your Design System More Than Just an Ideal
- Product Design /
- Product Development /
- Product Strategy /
Julian Pscheid
Keeping user experience and user interfaces consistent across the applications in your product is challenging. The presence of a design system alone is not enough to ensure alignment. Establishing a process to connect the design system with its implementation and distribution is key to achieving its ideals and benefits.
With a design system spec in hand, you have the foundation in place for a thoughtful and consistent user experience across the digital touchpoints of your product. In order to realize these benefits, however, there’s more work to be done; the abstract must become concrete. Specifically, your product team must connect the abstracted design system specification to the concrete code that comprises the user interfaces across your product. Absent this connection, the ideals of your design system are likely to remain only ideals, isolated and of little help to the reality of the users of your product.
Unfortunately, implementing a design system is not quite as simple as creating said design system, handing developers the design files, and turning them loose to code. A process of this nature increases the likelihood that the interfaces coded in your product fail to be aligned with the design system your team has specified.
Key characteristics of a solid design system process
There is not a single correct process to implement and maintain a design system, it will vary from organization/product to organization/product. However, there are some common characteristics a successful process should look to incorporate. Any process you put into practice should be: collaborative, comprehensive, and adaptable.
Collaborative
First and foremost, your process needs to be collaborative. Most product development teams have groups of people responsible for different things; user experience (UX), design (UI), development, project management, etc. It sounds obvious, but to successfully implement a design system, these groups need to work closely together. Adding some structure to how and when that collaboration occurs, via process, puts the framework in place for necessary collaboration to occur.
Your user experience and user interface experts have likely invested significant time and thought towards designing the components of your design system, but despite best efforts, documenting these nuances for someone else to implement is never foolproof. Even when using modern, best in class, design mockup and prototyping tools, important details are inevitably lost. UX and UI designers are, by trade, not developers, meaning certain technical aspects will not be considered in the design. Information needs to flow both ways between these groups. The path to implementation needs to be a collaborative one between designers and developers. This ensures that what is implemented stays true to the intent of the designed user experience. The collaboration works both ways; inevitably there will be user experience considerations that arise during implementation, states that were not accounted for in design, edge cases, etc., and developers will benefit from collaboration points with designers to find the best solutions possible. Your process needs to support these types of collaborations.
Comprehensive
The next key characteristic necessary for a successful design system implementation process is that it be comprehensive. That is, it needs to cover the full life cycle from design inception to the use of the coded components in your applications. You’ll need to map out these steps based on your product team, both to ensure the steps cover the complete life cycle, and to understand what groups of your product team should own and participate in each step.
Flexible
And finally, as with most successful processes, yours needs to be rigid and repeatable enough to make things easier and more efficient for your team, but flexible enough to handle iteration and improvement. As you put a process into practice, inevitably you’ll hit speed bumps. Don’t put yourself in a position you can’t iterate and improve.
Again, the process you use to implement a design system will need to be tailored to your team and product. It may be as simple as connecting discrete processes you already have in house (scrum sprints, design sprints, etc.). Whatever you end up with though, the characteristics just discussed should be present.
A 9 Step Plan for Implementing a Design System
In an effort to ground the ideas discussed so far, let’s take a look at an example process for implementing a design system. This is just an example of a process you could use, please do not think of this as a magic solution for your organization and product – you will need something that fits your specific situation.
With that disclaimer out of the way, let’s move on to the example. The diagram below outlines one particular design system implementation process that we have used with our clients and their internal teams. Typically this process fits into a larger process of software development (scrum, kanban).
Note that standard flowchart shapes have been used in the diagram (terminators, processes, decision).
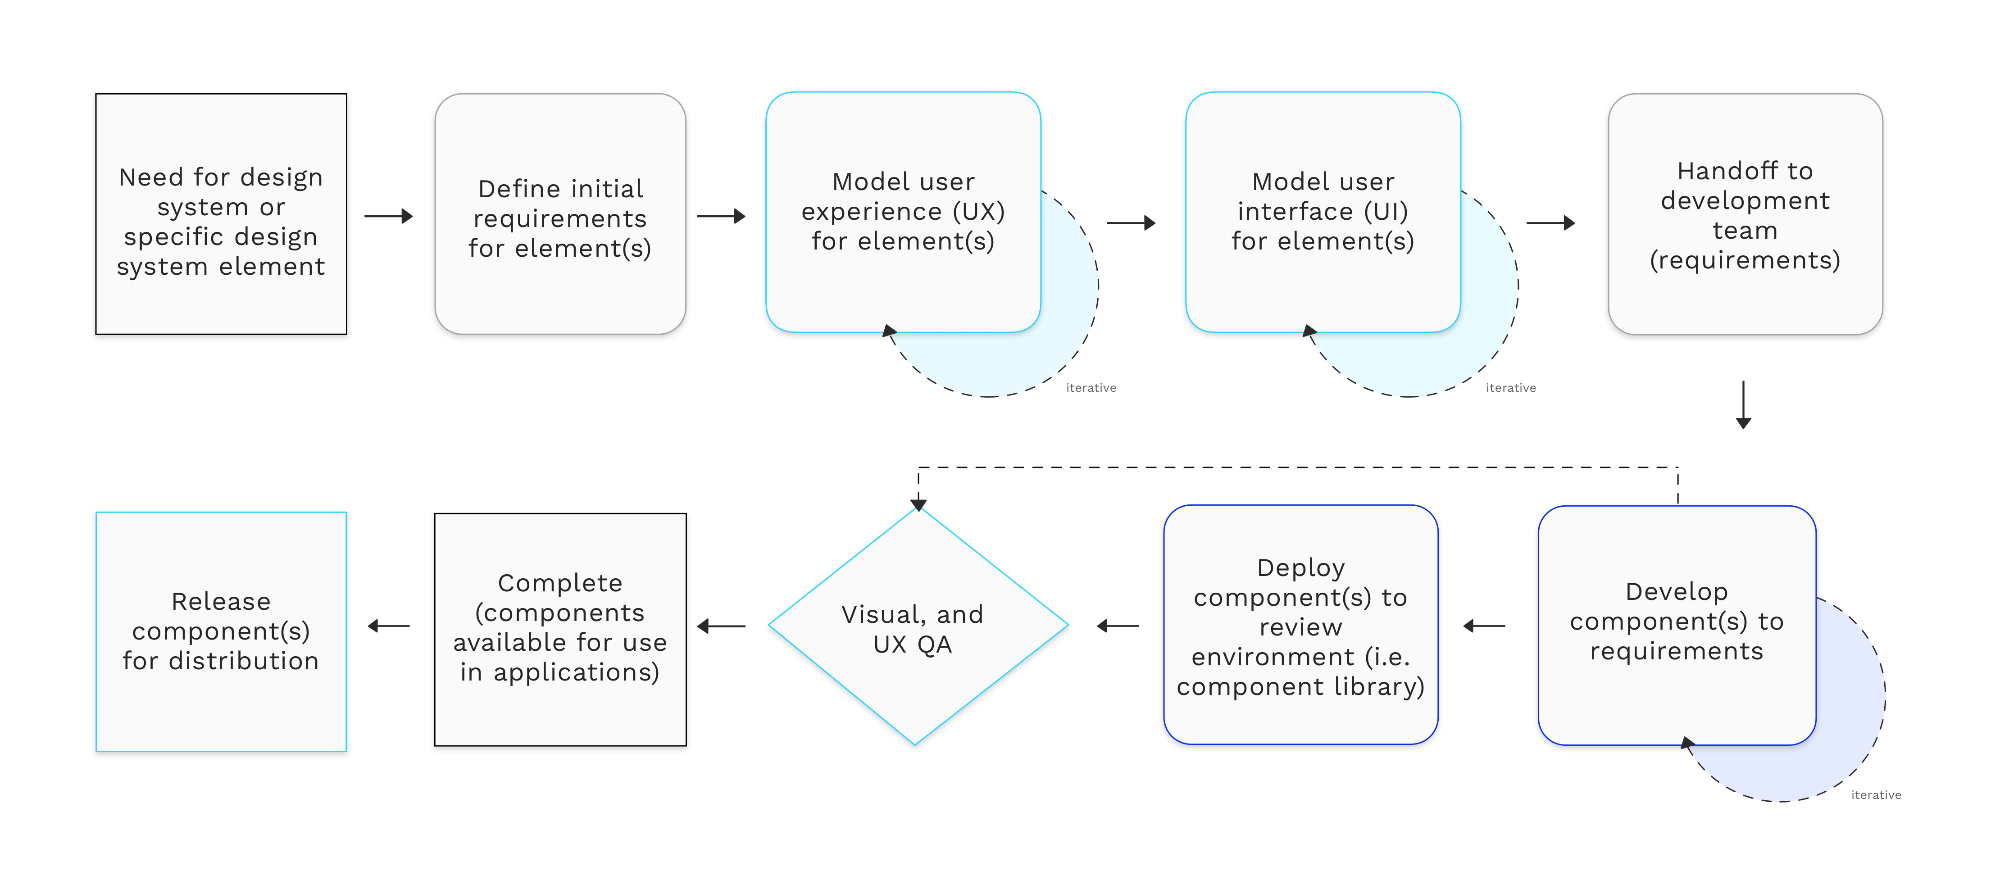
The intent is that the above process would be used, from design idea to distribution of code, for any element of a design system that warranted the coding of a reusable component for use in your digital product ecosystem. The process can be repeated for subsequent changes to an existing design system element as well. Also worth noting, what is proposed above is a process to be used within larger processes or whatever the product development workflow is in use at your particular organization.
Let’s walk through the steps/shapes on the diagram left to right:
- Inception: The starting point is the idea/need for a new element, or change to an existing element, in your design system – this tends to look different at different organizations. The starting point could also be you have an entire design system you want to put into code and get into your interface.
- Define requirements: Next the idea/need needs to be fleshed out into requirements. We recommend this process be collaborative, including representatives from UX, UI, and development, to ensure the requirements are realistic. Note the requirements at this point need not be overly verbose; they will almost certainly evolve in subsequent steps. The goal is to define the problem you are trying to address and the requirements of the solution.
- UX design: Next the UX team will tackle modeling a solution that meets the requirements. This often takes the form of wireframes, paper prototypes, or clickable prototypes. Typically this step is iterative and involves a review from the product manager/owner, as well as representation from the development team to ensure feasibility. Usually, at this stage, the solutions being modeled are not visually polished in regards to “look and feel”. Spurred by collaboration, often additional requirements will emerge and/or the original requirements will alter.
- UI design: Once basic UX is settled, a similar process step will repeat for the UI design to create the visual polish. This step again is likely an iterative process involving review and approval from the product owner/manager, as well as development. Requirements usually continue their evolution. In some product teams, steps 3 & 4 are merged.
- Handoff: Now things are ready to handoff to the development team for implementation. A collaborative session should occur where the UX/UI work completed so far can be reviewed in detail. This includes going over all the artifacts created – any written requirements, as well as any mockups, prototypes, etc. – as well as communicating any nuance not captured therein. Ideally, this is not the first time the developer(s) are seeing these artifacts so they can come prepared to ask questions. Involving the development team early and often in previous steps goes a long way towards avoiding big surprises and minimizing the amount of time required for this step. The solution being proposed here has already been vetted by key disciplines, ensuring its feasibility in the final design system.
- Develop: Next, the developers code the solution to the specifications provided. This step also tends to be iterative, usually including functional QA. Because predicting the future is hard, there will inevitably be questions on requirements, edge cases not thought of, etc. Collaboration with the UX/UI teams is again crucial to a successful outcome. Don’t make this step a black box as you will probably be dissatisfied with the output.
- Deploy: Once development is complete, the resulting implementation (code) needs to be deployed somewhere the UX/UI team can access it to review the functional result. Often a component library fills this role (more on that below).
- Visual QA: The visual QA step is a chance for the UX/UI disciplines to review the resulting implementation to ensure it satisfies the requirements and intent of the solution proposed. If the implementation step was not a black box, feedback at this juncture tends to be minimal. If there is feedback, developers handle those changes, redeploy, and another review occurs. This repeats until required approvers agree the implemented (coded) solution is acceptable.
- Release: Next the coded components are released for inclusion in the user interfaces of your digital product, usually via a tool that handles distribution of code packages (more on that below).
Hopefully walking through the example process gives an idea of how to create a collaborative, comprehensive, and flexible process to take your design system from idea to code.
Tools to support your design system implementation
Finally, let’s take a look at several tools, or categories of tools, that can help support the design system implementation process. These tools all fit nicely into the process outlined above, but are fairly adaptable should the process for your product look different.
Zeplin is a tool for collaboration between design and development, geared towards translating design assets into more detailed specifications for developers. Zeplin publishes plugins for the major user interface design tools (Sketch, Figma, Adobe XD, Adobe Photoshop CC). The Zeplin plugin can be used within the UI design tool to create a Zeplin export file containing development specs and assets automatically generated based on the designs. At Emerge, we typically plug this into our process at the design to development handoff, using the Zeplin export as an artifact of the design process, which our developers then utilize as a source of truth for translating design to pixel faithful implementation.
Zeplin also supports a feature called connected components to help developers keep track/connect design specs to code. More specifically this feature, surfaces links to source code, component libraries, or other documentation, within the context of the design files (when viewed in Zeplin). This is particularly useful in cases where elements of a design system have already been implemented (coded), as developers can more easily locate and keep track of the relevant components and source code.
A component library is a tool that helps your team implement a reusable collection of UI elements in isolation. When you have a design system, this is a library of the individual elements of the design system implemented in code. These components are the building blocks developers will use in creating the user interfaces of your product.
In regards to the process of implementing a design system, a component library is an excellent tool to organize and keep track of components that have been coded. Component libraries often also act as the environment where the visual QA step is performed, as they tend to include a web server component.
For web applications, the most common component library tools we see used are Storybook and bit. You can read more about these component library tools in a previous post on this site.
Component governance and distribution
Because design system components are usually implemented (coded) in isolation, there needs to be a sane approach to dependency management as well as means for developers to distribute these components for use when building the interfaces for your product. This is an area oft-overlooked, and one that leads to significant problems and technical debt if not done properly.
The most fully-featured tool in this arena is one we’ve already mentioned, bit. In addition to acting as a component library, it also offers governance (versioning, dependency management) and means of distribution (via NPM).
Tools & Process Are the Glue That Holds Design Systems Together
Keeping UI consistent in, and across, digital touchpoints within a product can be hard, even when you have a design system. The good news is, process and tools can help.
While unfortunately, no single universal prescription exists for implementing a design system, there are some key characteristics you should try to incorporate as you create your own process to suit your product and team. To support and enhance your process you can incorporate tools as needed. The end result should ensure a manageable and repeatable means to convert the abstract ideals of your design system into concrete benefits for the users of your product.